 | Cascading Style Sheets: The Definitive Guide |  |

We're going to discuss CSS2 selectors in some detail because they're likely to be one of the first parts of the specification to be implemented quickly. Therefore, while you might not be able to do everything described here as soon as you read this, expect most (if not all) of this to be included in browsers released in the year 2000 or later.
First, in addition to the existing selector mechanisms like contextual selectors, we have several new selector symbols that will make it a lot easier to construct very specific, very sophisticated selections -- without having to resort to sprinkling classes or IDs throughout the whole document.
The most powerful of the new selectors is the universal selector. This is specified using an asterisk (*), and it matches any element in the document. Thus, use this declaration to make sure all elements have a color of black:
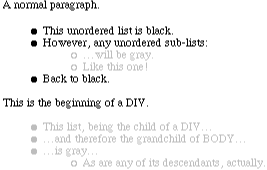
* {color: black;}When used as part of a contextual selector, the universal selector can create some interesting effects. For example, assume that you want to make gray any UL element that is at least a grandchild of the BODY. In other words, any UL that is a child of BODY would not be gray, but any other UL -- whether it's child to a DIV, a list item, or a table -- should be gray. This is accomplished as follows:
BODY * UL {color: gray;}Figure 10-3 shows the result of this declaration.

On the other hand, perhaps you wish to make purple any element that is a descendant of DIV. This would be written:
DIV * {color: purple;}At first glance, this seems no different than if the * were left out, instead relying on inheritance to carry the color to all descendants of DIV. However, there is a very real difference: the rule shown would match every DIV descendant, and therefore override the inheritance mechanism. Thus, even anchors (which are descendants of a DIV) would be made purple under the given rule, whereas simple inheritance would not be sufficient to make them purple.
While you can use the universal selector in combination with class and ID selectors, there isn't much reason to do so. The following two rules mean exactly the same thing:
*.apple {color: red;}
.apple {color: red;}
However, you should consider this: if you're concerned about older user agents that don't know about CSS2, then *.class (or *#id) is an easy way to fool them. Since both of these are examples of invalid selectors in CSS1, they should be ignored by CSS1-only parsers. If they aren't ignored, then they're likely to cause strange results. Therefore, it might be a good idea to omit the universal selector in conjunction with class and ID selectors.
Another interesting selector is the child selector, which is written using a greater-than symbol (>). This is used to match elements that are direct children of other elements:
BODY > P {color: green;}

<BODY>
<P>This paragraph is green.</P>
<DIV>
<P>This paragraph is not green.</P>
</DIV>
<P>This paragraph is green.</P>
</BODY>
Only the first and third paragraphs match the rule because they are children of BODY. The second paragraph is a child of DIV, and therefore a grandchild of BODY, so it does not match the rule.
Child selectors must have at least two or more selectors separated by the > symbol. It is possible to make a child selector part of a contextual selector as well:
DIV OL>LI EM {color: purple;}This rule matches any EM text that is a descendant of a list item, as long as that list item is a child of an OL element that is a descendant of a DIV. (Note also that there is no whitespace around the > symbol this time, which is legal; whitespace around this symbol is optional.) Thus:
<BODY>
<OL>
<LI>The EM text here is <EM>not</EM> purple.</LI>
</OL>
<DIV>
<OL>
<LI>Look, a list:
<UL>
<LI>The emphasized text here <EM>is</EM> purple.</LI>
</UL>
</LI>
</OL>
</DIV>
</BODY>
The purple EM text is purple because it's the great-grandchild of an LI that is the direct child of the OL, and the OL is the grandchild of the BODY element. The first EM is not matched because its grandparent OL is not the direct child of a DIV.
Even better, you can string more than one child selector together to precisely target a given type of element. Take this, for example:
BODY > OL > LI {color: silver;}

<BODY>
<OL>
<LI>The text here is silver.</LI>
</OL>
<DIV>
<UL>
<LI>Look, a list (and this text is not silver, by the way):
<OL>
<LI>The text here is <EM>not</EM> silver.</LI>
</OL>
</LI>
</UL>
</DIV>
</BODY>
Given this rule, we get results like those shown in Figure 10-4.

The first list item in the source is silver because it's the child of an ordered list that is itself the child of a BODY. The second list item in the source is the child of an unordered list, so it can't match the rule. Finally, the third list item in the source is a child of an ordered list, but the OL element is the child of an LI element, so it doesn't match either.
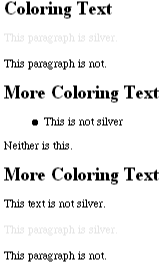
If you thought that was interesting, consider our next subject: the adjacent sibling selector. This is in some ways like the child selector, but in this case, styles are applied to elements that share a parent and are next to each other in the document tree. For example:
H2 + P {color: silver;}

<H2>Coloring Text</H2>
<P>This paragraph is silver.</P>
<P>This paragraph is not.</P>

<H2>More Coloring Text</H2>
<UL><LI>This is not silver</LI></UL>
<P>Neither is this.</P>

<H2>More Coloring Text</H2>
This text is not silver.
<P>This paragraph is silver.</P>
<P>This paragraph is not.</P>
In the first set of markup, a paragraph immediately follows an H2, so it is silver. In the second, the element adjacent to the H2 is a UL, which does not match the rule, and neither does the paragraph right after that. Finally, even though there is text directly after the third H2, it isn't part of an element, so the paragraph right after the text matches the rule and is colored silver. All this is demonstrated in Figure 10-5.

If you wanted to make any element immediately following an H2 silver, then the universal selector comes into play:
H2 + * {color: silver;}The fact that user agents ignore text between elements can actually be used to your advantage in many circumstances. Take, for example, a document design in which you want STRONG text to be gray, except when it follows EM text, in which case it should be silver:
STRONG {color: gray;}
EM + STRONG {color: silver;}

<P>While the first strong element is <STRONG>gray</STRONG>, the
<EM>second</EM> strong element is <STRONG>silver</STRONG>, because it
follows an "EM" element.
The result is shown in Figure 10-6.
With the introduction of attribute selectors , CSS gains a great deal of flexibility, precision, and power. Attribute selectors can be matched in four ways, each of which carries its own strengths and advantages.
First off, there is the ability to create a selector that matches any element with the specified attribute. For example, you can match all anchors with a NAME attribute, or all IMG elements with a BORDER attribute, or all elements that have a class of some type:
A[name] {color: purple;}      /* colors any NAME anchor purple */
IMG[border] {border-color: blue;}  /* sets blue border for any bordered IMG */
[class] {color: red;}        /* sets any classed element red */
In none of these situations does it matter what value is assigned to the attributes of each element. As long as the given attribute is present for the element, the element will match the selector shown. Thus, in the following example, the first two IMG elements shown will match the preceding rule, whereas the third will not, as illustrated by Figure 10-7:
IMG[border] {border-color: blue;}

<IMG SRC="one.gif" BORDER="1" ALT="image one (match)">
<IMG SRC="two.gif" BORDER="23" ALT="image two (match)">
<IMG SRC="three.gif" ALT="image three (no match)">
It is also possible to match attributes based on their values. Assume that you wish to style all hyperlinks as gray, except for those that point to the main page of the web site of the World Wide Web Consortium (http://www.w3.org/). These links should be silver instead, as shown in Figure 10-8:
A[href] {color: gray;}
A[href="http://www.w3.org/"] {color: silver;}
Thanks to the cascade, the second rule will apply when an anchor points to the W3C web site, overriding the previous rule.
It has been possible since HTML 3.2 to set multiple class names on a given element, such as:
<P CLASS="footnote example reference">
In CSS1 you could only refer to one of the values, using a selector like P.example. In CSS2, you can create a selector such that the class name must be an exact match, or you can set it up so that only one of the values has to match. P[class="example"] wouldn't match the preceding three-class paragraph, because the values are different (example isn't the same as footnote example reference).
On the other hand, P[class~="example"] would match footnote example reference because this type of selector has only to match oneof the values in the class attribute. The only difference is the tilde character (~), but what a difference!
As an example, let's assume a document in which elements can have one or more class values of driving, flying, nautical, directions, and title. Thus, an element could have a class of driving directions, or perhaps flying directions title. Furthermore, we decide that while all titles should be red, anything (other than a title) relating to flying should be green and anything relating to driving should be purple. These can be declared as follows:
*[class~="flying"] {color: green;}
*[class~="driving"] {color: purple;}
*[class~="title"] {color: red;}
The tilde (~) before the equals sign is what causes these selectors to match any one of the values in the class attribute. Thus, the following rule would match any IMG element with a class of figure and an alt attribute that contains the word Figure -- such as Figure 1, Figure 2, and so on:
IMG[class="figure"][alt~="Figure"] {margin: 5px;}

<IMG SRC="picture13.jpg" CLASS="figure" ALT="Figure 13">Using attribute selectors, you can also simulate class and ID selectors. The following pairs of rules are roughly equivalent:
P[class="directions"] {color: red;}
P.directions {color: red;}

DIV[ID="abc123"] {color: blue;}
DIV#abc123 {color: blue;}
Obviously, the latter rule in each pair is much simpler to type and edit, and you'll probably use such rules in most circumstances.
If you want an exact match, you can use an ordinary attribute selector. Thus, the following rule:
P[class="driving directions"] {color: green;}will match this markup:
<P CLASS="driving directions" >This is a side note (and it's green).</P>
If you aren't quite so concerned about exact matching, you can string class selectors together. This is a new feature of CSS2, and with this approach, you can match a class attribute with a value of driving directions in this way:
P.driving.directions {color: blue;}

<P CLASS="driving directions">This is a side note (and it's blue this time).
</P>
You could use the same selector to match the value directions for driving, since it contains both driving and directions -- just not in that order.
Again, this probably seems a bit easier to type. So why go to all the effort of using the longer notation of attribute selectors? The reason to use attribute selectors is that the .class and #ID selectors apply only to HTML documents, or to any other document that uses a language that includes the concepts of class and ID. Other languages, such as those based on XML, might not honor these conventions, in which case you'll need to use the attribute selectors instead.
The last type of attribute selector is generally used for language matching, but it does have other uses. Any attribute selector using the symbols |= will match a value that begins with the specified value, given that the value is at the start of a hyphen-separated value. For example:
P[lang|="en"]
This selector will match any paragraph whose lang attribute has the value en, en-US, en-UK, en-Cockney, and so on.
In fact, this can be used to match any value with a similar format. For example, if you have images with ALT text of fig-1, fig-2, fig-3, and so on, and want to match any of them, you could use this selector:
IMG[alt|="fig"]
This is a less likely use for |=, but it's still perfectly valid. Note that the previous rule would not match the value figure or config, as neither of them starts with fig- or is simply fig. The rule would match fig-tree, however.
Even though that might seem like it's more than enough, another area of expansion is in pseudo-class and pseudo-element selectors.
To begin, there is :hover. The basic idea is that the styles in a :hover rule are applied while your mouse pointer is "hovering" over an element. For example, when the pointer is positioned over a link such that clicking the mouse button would cause the browser to follow the link, the pointer is "hovering" over the link. This is in some respects similar to the somewhat famous JavaScript "rollover" trick, where images change when the pointer hovers over them. Thanks to :hover, you can specify a hover style very easily:
A:link {background: white; color: blue;}
A:hover {background: blue; color: white;}
These styles will cause anchors to "reverse" in color when the mouse pointer hovers over them, as illustrated in Figure 10-9.
As a matter of fact, the rule for A:hover would be used while the pointer hovers over any anchor, not just a hyperlink. While some other pseudo-classes, like :link and :visited , are constrained to the A element in HTML, the same is not true of :hover. User agents could, in theory, allow the assignment of hover styles to any element, like this:
P:hover {font-weight: bold;}Therefore, if you want to make sure your hover styles are applied only to your hyperlinks, you would need to use this rule:
A:link:hover {background: blue; color: white;}The ability to combine pseudo-classes is a new feature of CSS2.
WARNING
Internet Explorer 4.x and 5.x both recognize :hover on anchors only. As of this writing, no other browser will recognize :hover under any circumstances.
Similar to :hover is :focus, which is used to define styles for elements that are "in focus." A form element, for example, has "focus" when it is currently ready to accept input. Therefore, the background of INPUT elements could be set to yellow in order to highlight the currently active input:
INPUT:focus {background: yellow;}This style would only be applied to an element as long as it was in focus. As soon as the user switched from one input to another, the styles would be removed from the former and applied to the latter. This is a welcome capability, as it reduces the need for using JavaScript to create such effects.
TIP
There are serious issues related to document reflow with :hover and :focus. Take, for example:
A:hover {font-size: 200%;}In theory, a user agent would have to double the size of anchor text as the pointer hovers over it, which could well cause major redisplay issues. An author could cause similar problems by declaring that TEXTAREA elements should change their size when they are in focus. User agents are not required to reflow the document based on styles assigned to these pseudo-elements, although some may do so -- it remains to be seen.
On a completely different note is the pseudo-class :lang, which is used to apply styles to elements with matching languages. Let's say you want all paragraphs in English to be black on white, and all paragraphs in French to be white on black:
P:lang(en) {color: black; background: white;}
P:lang(fr) {color: white; background: black;}
Of course, user agents aren't likely to figure out element languages on their own. Instead, they have to rely on document markup, such as the lang attribute in HTML:
<P lang="en">This paragraph is in English.</P> <P lang="fr">Ce paragraphe est en français.</P>
The results are shown in Figure 10-10.

Even if this isn't something you're likely to use often, it can still come in very handy. For example, you could define styles to apply to entire documents:
HTML:lang(de) {color: black; background: yellow;}Thus would all HTML documents marked as German be shown as black text on a yellow background. This marking could be made with the lang attribute, in a META tag in the document's head, or even as a value in the document's HTTP headers. This is somewhat similar to the |= attribute selector discussed in the previous section, but it is a little more general.
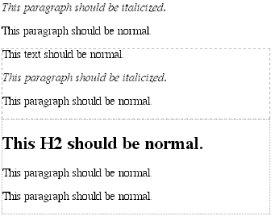
The last of the new pseudo-class selectors we'll cover here is the :first-child selector. This is used to match an element that is the first child of another element. For example, you might want to make the first child of every DIV italicized instead of normal text, as long as that first child is a paragraph (shown in Figure 10-11):
P {color: black;}
P:first-child {font-style: italic;}

<BODY>
<P>This paragraph should be italic.</P>
<P>This paragraph should be normal.</P>
<DIV STYLE="border: 1px dashed gray;">
This text should be normal.
<P>This paragraph should be italic.</P>
<P>This paragraph should be normal.</P>
</DIV>
<DIV STYLE="border: 1px dotted gray;">
<H2>This H2 should be normal.</H2>
<P>This paragraph should be normal.</P>
<P>This paragraph should be normal.</P>
</DIV>
</BODY>
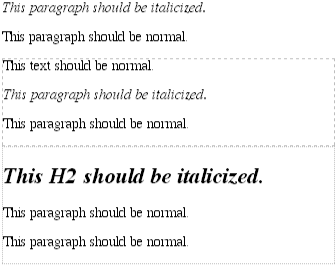
The very first paragraph is italicized because it is the first child of the BODY element. Similarly, the first paragraph in the first DIV is italicized because it is the first child of the DIV, even though text preceded it. Only structural elements count for this pseudo-class, so the text before the paragraph doesn't affect the paragraph's status as the first child. However, in the second DIV, the H2 is the first child, so it does not match the rule P:first-child. If the intent is to have the first child of any element be italicized, no matter what element that might be, then you need only leave off the element part of the selector, or use it in conjunction with the universal selector. This will yield the result shown in Figure 10-12:
*:first-child {font-style: italic;}
Now let's say we want to apply styles to elements that are part of a first child; for example, all emphasized text within a first-child paragraph should be italicized:
P:first-child EM {font-style: italic;}Of course, this will match any first-child paragraph, no matter its parent element. Suppose instead we want a rule that applies only to paragraphs that are the first children of DIV elements. In that case, we need to use the child selector:
DIV > P:first-child {font-style: italic;}This translates as, "any paragraph that is a first child, and is a child of a DIV, should be in italics." If we were to leave out the child selector as follows, though:
DIV P:first-child {font-style: italic;}then the rule would read, "any paragraph that is a first child of any element, and is also a descendant of a DIV, should be in italics." The difference is subtle, but real.

Copyright © 2002 O'Reilly & Associates. All rights reserved.