 | Cascading Style Sheets: The Definitive Guide |  |

As I've mentioned before, CSS is powerful because of the way in which it uses the structure of HTML documents to determine which styles should be applied in what ways. That's really only a part of the story, though, since it implies that the only way CSS uses document structure is to determine which rules apply to which elements.
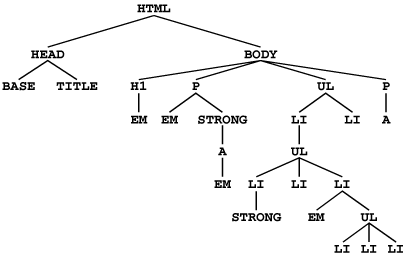
The truth is that structure plays a much bigger role in the way styles are applied to a document. In order to understand this role, we need to understand how documents are structured. Take the "tree" view in Figure 2-18 of the simple HTML document listed here:
<HTML>
<HEAD>
<BASE HREF="http://www.meerkat.web/">
<TITLE>Meerkat Central</TITLE>
</HEAD>
<BODY>
<H1>Meerkat <EM>Central</EM></H1>
<P>
Welcome to Meerkat <EM>Central</EM>, the <STRONG>best meerkat web site
on <A HREF="inet.html">the <EM>entire</EM> Internet</A></STRONG>!</P>
<UL>
<LI>We offer:
<UL>
<LI><STRONG>Detailed information</STRONG> on how to adopt a meerkat</LI>
<LI>Tips for living with a meerkat</LI>
<LI><EM>Fun</EM> things to do with a meerkat, including:
<UL>
<LI>Playing fetch</LI>
<LI>Digging for food</LI>
<LI>Hide and seek</LI>
</UL>
</LI>
</UL>
<LI>...and so much more!</LI>
</UL>
<P>
Questions? <A HREF="mail to:[email protected]">Contact us!</A>
</P>
</BODY>
</HTML>
Much of the power of CSS is based on the parent-child relationship of elements. HTML documents, and indeed most structured documents of any kind, are based on a hierarchy of elements, which is visible in the "tree" view of the document in Figure 2-18. In this hierarchy, each element fits somewhere into the overall structure of the document, and every element is either the parent or child of another element, and often both.

An element is said to be the parent of another element if it encloses the other element. For example, in Figure 2-18, the P element is parent to an EM and a STRONG element, while the STRONG is parent to an anchor element which is itself parent to another EM element. Conversely, an element is the child of another element if it is enclosed by the other element. Thus, the anchor element in Figure 2-18 is a child of the STRONG element, which is in turn child to the paragraph, and so on.
The terms parent and child are often generalized to the terms ancestor and descendant. There is a difference: in the tree view, if an element is exactly one level above another, then they have a parent-child relationship. (Of course, the child is also a descendant, and the parent is an ancestor.) If, however, the path from one element to another moves through two or more levels, then the elements have an ancestor-descendant relationship. In Figure 2-18, the first UL element is parent to two LI elements and a UL, but the first UL is also the ancestor of every element within its child UL, all the way down to the most deeply nested LI elements.
If we continue to examine Figure 2-18, we see that, for example, the anchor is a child of STRONG, but also a descendant of the paragraph element as well as of the BODY and HTML elements. The BODY element is an ancestor of everything the browser will display, of course, and the HTML element is ancestor to the entire document. For this reason, the HTML element is also sometimes called the root element.
The first benefit we derive from this model is the ability to define contextual selectors. This is simply the act of creating rules that operate in certain structural circumstances but not others. As an example, let's say you want to set EM text to be gray, but only if it's found within an H1 element. You could put a CLASS attribute in every EM element within an H1, but that's almost as bad as using the FONT tag. It would obviously be far better to declare rules that only match EM elements which are found inside H1 elements.
To do so, you would write the following:
H1 EM {color: gray;}This rule will make gray any text in an EM element which is the descendant of an H1 element. Other EM text, such as that found in a paragraph or a block quote, will not be selected by this rule, as Figure 2-19 makes clear.
In a contextual selector, the selector side of a rule is composed of two or more space-separated selectors. Each space can be translated as "found within," "which is part of," or "that is a descendant of," but only if you read the selector backwards. Thus, H1 EM can be translated as, "Any EM element that is a descendant of an H1 element." (If you insist on reading the selector forwards, then you might phrase it something like, "Any H1 that contains an EM will have the following applied to the EM.")
You aren't limited to two selectors, of course. For example:
UL OL UL EM {color: gray;}In this case, as Figure 2-20 shows, any emphasized text that is part of an unordered list that is part of an ordered list that is part of an unordered list will be gray. This is obviously a very specific selection criterion.

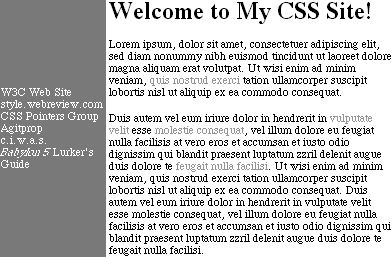
Contextual selectors can be very, very powerful. They make possible what could never be done in HTML -- at least not without oodles of FONT tags. Let's consider a common example. Assume you have a document that has a sidebar and a main area. The sidebar has a blue background, and the main area has a white background. You have a list of links in the sidebar, but you also have links which appear in the main text. You can't set all links to be blue, because they'd be impossible to read in the sidebar (blue text on a blue background).
The solution? Contextual selectors. In this case, you set the table cell that contains your sidebar to have a class of sidebar, and the main area to have a class of main-page. Then you write styles something like this:
TD.sidebar {background: blue;}
TD.main-page {background: white;}
TD.sidebar A:link {color: white;}
TD.main-page A:link {color: blue;}
Figure 2-21 shows the result: white hyperlinks on a blue background in the sidebar, with blue links on a white background in the main area of the page.

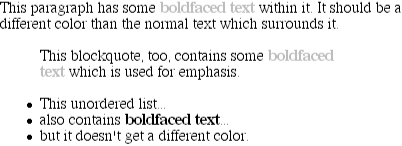
Here's another example: let's say that we want gray to be used as the text color of any B (boldface) element that is part of a BLOCKQUOTE, and also for any bold text that is found in a normal paragraph:
BLOCKQUOTE B, P B {color: gray;}The result, shown in Figure 2-22, is that while the boldface text in paragraphs and block quotes is gray, boldface text in lists is not colored gray.

TIP
Thankfully, contextual selectors are one of the things that almost everyone got right the first time they tried -- although there are some minor random quirks to be found in Navigator 4.x that defy analysis. In general, though, like grouping, contextual selectors are as safe and stable an operation as you're going to find.

Copyright © 2002 O'Reilly & Associates. All rights reserved.